
3 Vectors
Last section we learned to use a coordinate system to describe an object’s position. As it turns out, dipslacement vectors provide an even better way of doing this. Let’s start with a definition:
A displacement vector is a set of instructions of how to move.
For example, the vector  could be “move
  m to the right, and
  m upwards,” which we can write as
  . If is negative, then we move left instead of right. If is negative, we move down instead of up. The quantities and are called the components of the vector . I know this sounds like this is no different from what we did before, but in the next chapter will discover why thinking about displacement vetors is so useful. For now, let’s consider some properties of vectors.
Exercise 3.1: Vector Representations
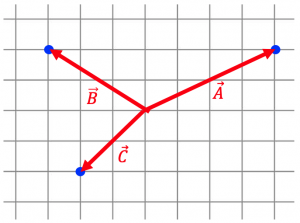
We can represent a displacement vector as an arrow that tells us how to move. E.g. the plot below shows three displacement vectors:
- = “move 3 to the right and 1 down.”
 = “move 1 to the left and 2 down.”
 = “move 3 to the right and 2 up.”
Drag each of the labels for vectors , , and to the correct arrow.
The fact that we can represent vectors with arrows makes it obvious that the way in which a vector can give instructions is not unique! E.g. rather than specifying how far we move along the  and
and  axis, we can specify the direction and total distance travelled (e.g. travel 5 mi North-East). In math, the length of a vector (how far we need to go) is called the magnitude.
All vectors have both a magnitude and a direction.
The magnitude of a vector is denoted as  , though the shorthand
  is also fairly common, and is what I will use in this book.
Exercise 3.2: Calculating Vector Magnitudes
The plot below show the displacement vectors that would take you to see each of your three friends, Aisha (), Beth (), and Charlie (). Each grid cell is 1 m across.
Use the diagram below to calculate the magnitude of the vectors , , and . If you are feeling stuck, look at the hint.
We can use the same “trick” of looking at the right triangle formed by the vector and the and axis to calculate the components of a vector given its magnitude. Let’s try it!
Exercise 3.3: Calculating Vector Components
Consider the vector  shown in the picture below, and let
  be the vector’s magnitude.

A) Find the and components of the vector  in terms of the magnitude and the angle
  .
.
B) Now find  and
and  , but use the angle
  instead of . There’s a very good reason I’m asking you to do this, which we’ll get to in a second (see warning below).
If you’re not sure how to do part B, we go through the solution in the video below.
 . Do not do this! As you saw in the previous problem, which trigonometric function you use to find the components of a vector depends on what angle you are using! The only way to get this right every time is to look at the drawing and figure it out.
Key Takeaways